RUST 101: Unleashing the Power of Rust 🦀
A Comprehensive Guide to High-Performance Programming

I am a Committed and Motivated Tech optimist, whose passion lies at the intersection of Technology and Innovation.
Introduction
Rust, according to Wikipedia, is a multi-paradigm, high-level, general-purpose programming language that emphasizes performance, type safety and concurrency. It is a systems programming language that was developed by Mozilla Research, designed to be fast, reliable, and secure, with a syntax that is similar to C++. So where did Rust come from? Rust was started in 2006 as a personal project of a Mozilla employee named Graydon Hoare.
The MIT Technology Review, explains more on its origin in their post, 'How Rust went from a side project to the world’s most-loved programming language'.
Returning home to his apartment in Vancouver, Hoare found that the elevator was out of order; its software had crashed. This wasn’t the first time it had happened, either.
Hoare lived on the 21st floor, and as he climbed the stairs, he got annoyed. “It’s ridiculous,” he thought, “that we computer people couldn’t even make an elevator that works without crashing!” Many such crashes, Hoare knew, are due to problems with how a program uses memory. The software inside devices like elevators is often written in languages like C++ or C, which are famous for allowing programmers to write code that runs very quickly and is quite compact.
...
Hoare decided to do something about it. He opened his laptop and began designing a new computer language, one that he hoped would make it possible to write small, fast code without memory bugs. He named it Rust, after a group of remarkably hardy fungi that are, he says, “over-engineered for survival.”
...
Seventeen years later, Rust has become one of the hottest new languages on the planet—maybe the hottest.
Mozilla started sponsoring Rust officially in 2009 and version 1.0 was released in 2015.
Why Rust?
Rust is a systems programming language pursuing the trifecta: safety, which is guaranteed at compile time; fearless concurrency, which is a lot easier when things are safe; and blazingly fast speed due to zero-cost abstractions and others.
High-level scripting languages like Python will get you safety but not concurrency or speed. On the other hand, systems languages like C and C++ will give you speed and some access to concurrency, but forget about safety, because they will willingly let you harm yourself by the design.
Did you hear about Firefox Quantum in 2017?
It was a big update! Suddenly Firefox was over twice as fast, and less buggy!
Why?
Because the core of Firefox was rewritten in Rust.
Rust combines low-level control over system resources with high-level abstractions, making it a versatile language that can be used for a variety of applications.
In this article, we are going to cover all the stuff you need to know to be able to start using and advancing in Rust.
Buckle up and let's kick off...
Getting Set for Success!
Before we start writing Rust code, we need to set up our developer environment. This includes installing Rust and other tools that are required for one to seamlessly work with Rust.
To set up your developer environment, I highly advocate for the 'The Rust Programming Language' online book installation guide as it is more detailed on how to download and install Rust, depending on one's operating system.
Additionally, the book is an unparalleled resource for diving deep into the inner workings of Rust and has a comprehensive coverage of Rust concepts and practices.
fn main() {
    println!("Installed Rust? Lets Go...!");
}
Fundamentals
Cargo
Them that have interacted with Python, they've possibly heard of pip. For JavaScript Developers, there's a high chance one has interacted with npm. Additionally, for Android or Java Developers, gradle might be a famous term. These tools are known as Package Managers. These are tools that enable the automatic installation, configuration, and deletion of software modules, or packages.
Cargo is Rust's, Package Manager. Besides being the package manager, Cargo is also the build system, test runner and documentation generator. It downloads your Rust package’s dependencies, compiles your packages, makes distributable packages, and uploads them to crates.io, the Rust community’s package registry.
Have you installed Rust and all the required tools as stated in the 'The Rust Programming Language' online book installation guide? I believe you have. Let's try a fun exercise to practically learn how Cargo works.
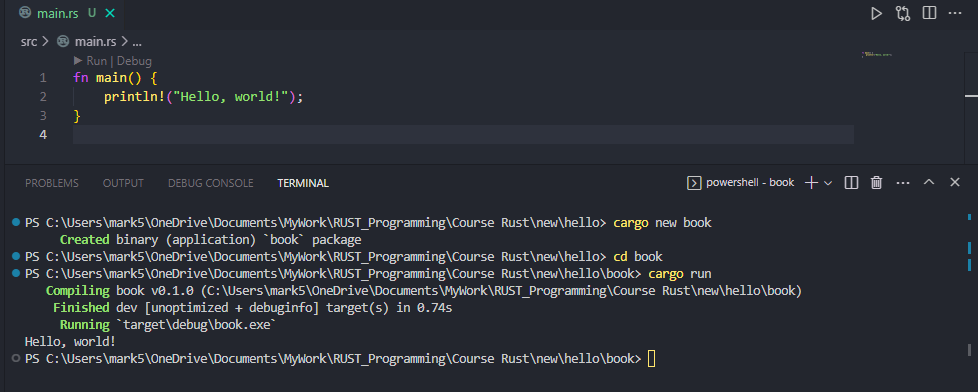
- Open the terminal and type
cargo new bookthen hit 'Enter'.
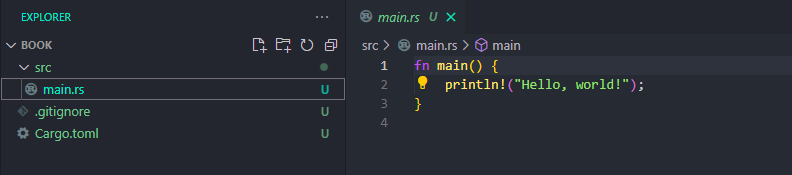
Cargo will immediately create a project folder named 'book' with some files in it. In the 'book' directory is a file named 'Cargo.toml' and an 'src' subdirectory with a file named 'main.rs' in it.
The 'Cargo.toml' file is the config file for the project. '.toml' extension stands for Tom's Obvious Minimal Language which is a file format for configuration files intended to be easy to read and write due to obvious semantics which aims to be "minimal", and is designed to map unambiguously to a hash table or dictionary.
[package]
name = "book" # name of the package
version = "0.1.0" # version of the package
edition = "2022" # edition of the Rust language

[dependencies]
Getting to the 'main.rs' file in the 'src' subdirectory, it already has a 'hello world' program:
fn main() {
    println!("Hello, world!");
}
To run the program we use the cargo run command in the terminal (while in our projects directory) - cd book. After running the command, 'Hello, world!' will be displayed in the terminal right after Cargo finishes building.
If you run cargo run again in the terminal without formatting the 'main.rs' file, Cargo does not recompile the project.
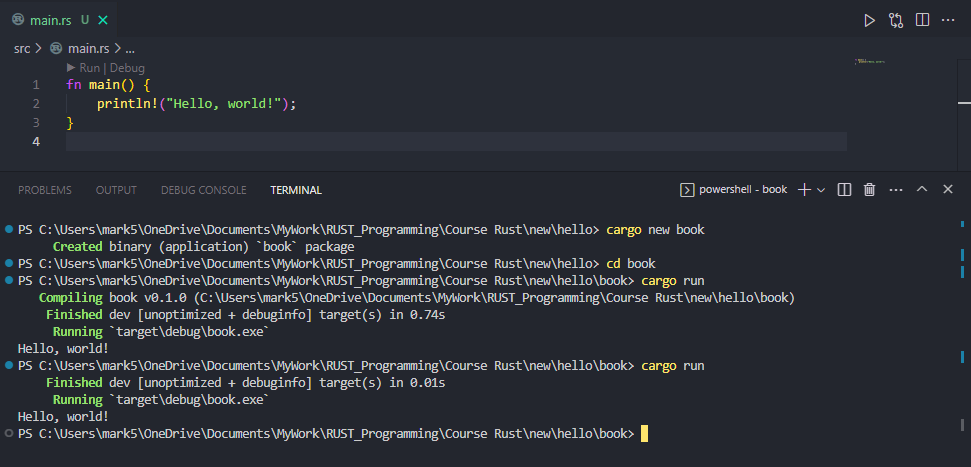
There's a second way of running Cargo to build your project and display the output and we will find out why that way is more efficient.
In the terminal, we see that Cargo is getting the output by 'Running' target\debug\book.exe.
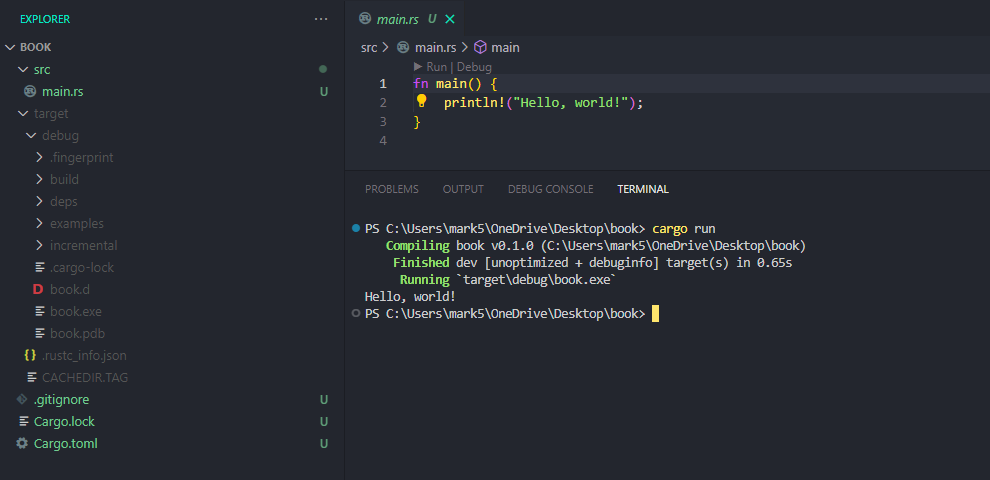
To explain this, initially, after creating the project cargo new book, we had a few files in our project as discussed above:
However, after compiling the main.rs file, cargo generates another subdirectory known as 'target' where it stores the compiled program and all its additional build artefacts. This is because Cargo compiles your project with debug symbols by default:
The debug symbols are however to be ignored while committing and pushing your code to GitHub or while using a version control tool. One may opt to use a .gitignore file but here, I will show you the second way how to let Cargo build your program without debug symbols:
cargo run --release
Adding --release to cargo run makes the compiled program be stored in the release subdirectory which additionally has an added advantage as the program will run faster in release mode.
Variables
Variables, in layman's terms, are containers that hold value(s). Variables are memory locations used to hold different forms of data. Example x = 10, means that x holds an integer or value 10. This means that x is the variable while 10 is the data or the value.
In Rust, we have variables as well. Open the main.rs file and edit the code to look like the one below:
fn main() {
    let cars = 20;
}
Let's break down the code above, but ignoring fn main() { } as we will later come to learn what that is and focus on the let cars = 20;
Them that have worked with JavaScript, have come across the let keyword. This is a keyword used while one is declaring a variable. In programming, declaring a variable is telling the compiler about the existence of an entity in the program and its location. In the example above, when we type let cars, the compiler automatically understands that cars is a variable. In languages like Python, we don't have a keyword to declare a variable hence while declaring a variable, we just type the variable name and then assign it a value.
After declaring a variable, let cars, we need to initialize it. Initializing a variable is assigning a value to it. As we have discussed above, a variable holds a value, hence when we type let cars = 20, we have initialized the variable cars by assigning the value 20 to it.
When declaring a variable, we specify the variable name (as we've stated above) but also the data type of the data that the variable will hold. Rust is a statically typed language, so in our code above, where is the type annotation?
Well, whenever Rust can figure out the appropriate type for you, you can just leave the type annotation out. However, when you annotate the type, the code looks like the one below (We'll however discuss later in the article about types):
fn main() {
    let cars: i32 = 20;
}
The i32 after the colon means the variable will store a 32-bit signed integer type.
Above is how we use the let statement to declare a single variable and initialize it. However, the let statement can be used in initializing multiple variables in a process known as destructuring. Destructuring is the process of breaking a structure or unpacking values by breaking a complex data structure down into smaller data structures. Example:
fn main() {
    let (cars, people) = (20, 40);
}
The let statement has been used to destructure the data on the right-hand side (values) and use it to initialize variables inside of a corresponding pattern on the left-hand side (To be covered later in the article).
Variables are immutable by default in Rust, which means the values they store cannot change or cannot be over-written. However, you can choose to make the variables mutable so that you can manage to change their value later in the code. Most languages default to mutable variables but why is it that in Rust, variables are immutable by default? As mentioned at the start... Safety, Concurrency and Speed.
By ensuring that a value remains constant, you can prevent numerous bugs that may otherwise occur. Hence safety is improved.
Imagine being able to share data seamlessly between multiple threads without worrying about locks or synchronization issues. Well, it's possible! By keeping certain data static and unchanging, you can drastically improve concurrency and facilitate a smoother, more efficient system.
Did you know that the compiler can perform extra optimizations on data that it knows won't change? By keeping certain data constant/immutable, you not only enhance safety and concurrency, but you can also boost the speed of your system. The compiler can optimize the code in ways that wouldn't be possible with changing data, resulting in faster and more efficient performance.
That's why data is immutable by default in Rust for safety, concurrency and speed.
But let's face it, sometimes we need to change the value of a variable! We can't just change the value of cars as long as it is immutable as this will return an error:
fn main() {
    let cars = 20;
    cars = 30;
}
#Output cargo run:
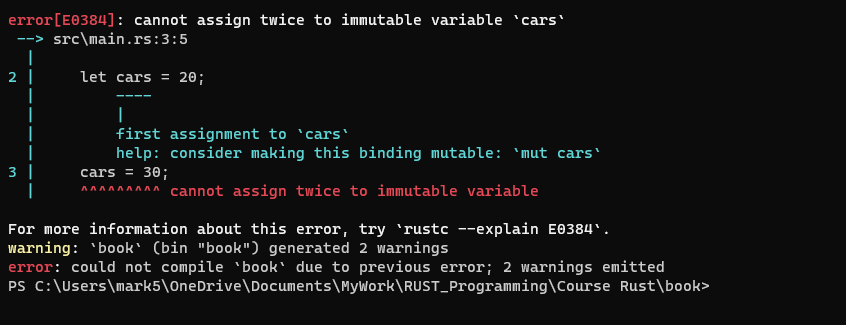
cannot assign twice to immutable variable 'cars' - Source of the error: src\main.rs:3:5 - src directory; main.rs file; line 3 and column 5.
In the terminal, we however have a contextual explanation of what we are doing wrong and how we might fix it. On line 2 we initialize an immutable variable 'cars' to the value 20. Therefore on line 3 we cannot assign a different value. Immutable means you can't change it! What does the compiler suggest?
help: consider making this binding mutable: `mut cars`
Yes, we can make variables mutable in Rust by adding the mut keyword before the variable. Below is a version of the code that will work:
fn main() {
    let mut cars = 20;
    cars = 30;
}
Besides let, we also have another keyword used when declaring a variable; const.
const is used the same way as let but a variable declared with const may be referred to as an 'immutabler' variable - cannot be modified at all. There are four different things about declaring a constant as opposed to using let:
fn main() {
    const MY_HEIGHT: f64 = 30.9;
}
const instead of let is used to declare a variable.
constThe variable naming convention is to use SCREAMING_SNAKE_CASE, meaning all are uppercase words and separated by underscores.
MY_HEIGHTThe type annotation is required.
f64The value must be a constant expression that can be determined at compile time.
30.9
The Rust team is however adding more and more standard library functions to the constant list in every release.
So why would you go to all this trouble to use a const?
First, you can place a constant outside of a function at module scope (covering this later in the article) and use it anywhere you want. A global; immutable, constant global.
Second, because const values are inlined at compile time, they are really fast!
Scope
Scope is the area under which a variable is applicable or visible in one part of a program to another part of that program. One can also refer to scope as a place in the code where one is allowed to use variables - It is how our program's variables are organized and accessed. Do the three explanations ring anything in mind? haha! Let's get deeper...
Scoping asks the question, Where do variables live? or Where can we access a certain variable and where not?
The scope of a variable begins where it is created and extends to the end of the block. Along the way, it is accessible from nested blocks. A block is a collection of statements inside curly braces which includes function bodies:
fn main() {
    let x = 10;
    {
        let y = 30;
        println!("{}, {}", x, y);    //Works fine
    }
    println!("{}, {}", x, y);        //Returns an Error
}
In the example above, x is declared in the main function's block fn main() { }. We then create another block { } inside the main function's block forming a nested block. Inside the nested block, we declare variable y, and then we output x and y println!("{}, {}", x, y); .
println!() - printline is a command in Rust used to output or display a specific value. In the example above, we want to display the value(s) stored in both variables x and y respectively.
The first println!("{}, {}", x, y); works just fine because x is accessible from nested blocks. However, the second println!("{}, {}", x, y); returns an error because, after the second curly brace, }, the block ends, and y is immediately dropped at this point hence the second println! does not work and returns an error at compile time - cargo run.
So, we would either need to hoist the second printline macro up into the same scope as y, or move y down to the same scope as the second print line macro.
fn main() {
    let x = 10;
    {
        let y = 30;
        println!("{}, {}", x, y);    //Works fine
        println!("{}, {}", x, y);    //Second printline macro
    }
}
fn main() {
    let x = 10;
    let y = 30;
    {
        println!("{}, {}", x, y);    //Works fine
    }
        println!("{}, {}", x, y);    //Second printline macro
}
Variables can also be shadowed.
Shadowing of variables occurs when a variable declared within a certain scope has the same name as a variable declared in an outer or enclosing scope. This is also referred to as masking where the outer variable becomes shadowed by the inner variable, and the inner variable masks the outer variable.
fn main() {
    let x = 10;
    {
        let x = 30;
        println!("{}", x);    // Prints 30
    }
    println!("{}", x);        // Prints 10
}
In the above example, we create variable x and initialize it to 10 in the outer block. Then in the inner block x is shadowed with a new value of 30. These two x's are different variables with different values. They just overlap in scope.
One can also shadow variables in the same scope:
fn main() {
    let mut x = 10;     //x is mutable
    let x = x;          //x is now immutable
}
One can also shadow a variable to a different type in the same scope, which is more common in data transformation pipelines that discard intermediate representations.
fn main() {
    let person = "Mark Gatere";
    let person = make_image(person);
}
Memory Safety
Rust guarantees memory safety at compile time. As a part of that, variables must be initialized before one can use them.
fn main() {
    let age: i32;
    println!("{}", age); // Returns an error
}
In the example above, the code won't work and will return an error (won't even compile) because age has been declared but not initialized to a value before one tries to use it.

used binding `age` isn't initialized
Solution - help: consider assigning a value
As long as the compiler can guarantee something is safe, it will let you do it but if not, it will not let you.
Functions
We have already used function(s) above, the main function: fn main() { }. A function is a block of organized, reusable code that is used to perform a single, and related activity.
fn main() {
    let age: i32 = 20;
    println!("{}", age);
}
Functions in Rust are defined using the fn keyword. The keyword is then followed by the function name main() and then the function body inside the { } symbols - (curly braces). An example of a function is fn do_stuff() { } - fn is the function keyword, do_stuff is the function name followed by () brackets then the function body (what the function is to do) which is found in between the braces { }. The Rust style guide advocates for use of snake_case for function names (lowercase words separated by underscores).
fn main() {
    do_stuff()
}

fn do_stuff() {
    let eggs = 20;
    println!("You should buy {} eggs today.", eggs);
}
An awesome thing about Rust is that functions don't have to appear in the file before the code that calls them (eg: main function).
For those who have worked with the C programming language, when a function is called in the main function, that function must be declared or defined before it can be used. This means that the programmer must carefully manage the order in which functions are declared or defined to avoid errors. However, in Rust, functions can be called from code that appears before the function's declaration or definition in the file. This is because Rust can look ahead in the code to find the necessary information about the function which makes it easier and more flexible for programmers to organize their code. They can write functions without worrying about the order in which they appear in the file.
Functions have parameters which are variables used in the header of a function. Function parameters in Rust are defined with name: type, the name of the parameter and its type, and multiple parameters separated by a comma.
fn do_stuff(qty: f64, age: i32) {
    // (function Body)
}
To specify the return type of the function (the data type of the value the function will return), we can use an arrow at the end of the parameters pointing to the return type:
fn do_stuff(qty: f64, oza: f64) -> f64 {
    // (function Body)
}
In the function above, the do_stuff function will return a value of type float, f64.
We can return a value from the function using the return keyword/statement as in other languages. However, in Rust, there is also a shorthand for returning values. If you leave the semicolon off of the last expression in a block then it will be returned as the value of the block. This is called the tail expression.
fn do_stuff(qty: f64, oza: f64) -> f64 {
    return qty * oz;
}
fn do_stuff(qty: f64, oza: f64) -> f64 {
    qty * oz
}
In the two examples of functions above, { return true; } is the same as { true } where the first block has a return statement, while the second one has a tail expression. It is referred to as an expression as it is not terminated with a semicolon. However, when a semicolon is used at the end, it makes it a statement. Whenever you are returning something at the end of the block, the shorter way is preferred in idiomatic Rust (- following the conventions of the language).
Calling a function looks the same as in most other languages:
fn main() {
    let x = do_stuff(2.0, 12.5);
}

fn do_stuff(qty: f64, oza: f64) -> f64 {
    qty * oza
}
There's currently no support for named arguments at the call site so you need to provide all the values in the correct order.
To explain the statement above, in different languages, when you call a function, you can pass arguments in two ways: either by their position or by their name. Positional arguments are the ones that are passed in the order they appear in the function signature, while named arguments are specified explicitly by their name. However, in Rust, you cannot specify the argument names in the function call and must rely on the order in which the arguments appear in the function signature.
fn example_function(x: i32, y: i32, z: i32) {
    // (function body)
}

example_function(1, 2, 3); //correct

example_function(y=2, x=1, z=3); // Error: named arguments are not supported.
Finally, a single Rust function does not support variable numbers of arguments or different types for the same argument, but macros such as println! do. A macro call looks just like a function call except for the name of a macro always ends with an exclamation mark, for example println!.
This means that, if for instance, you define a function with two parameters of type i32, you can only pass in two i32 values when calling that function. You cannot pass in a different number of arguments, such as three or four, and you cannot pass in arguments of a different type, such as a string or a boolean. Rust macros such as println! are however a bit different from functions in that they can take a variable number of arguments and different types of arguments. This is because macros are expanded at compile time before the code is executed hence allowing them to accept a variable number of arguments and different types of arguments, whereas functions are executed at runtime.
Example Code:
// This is a function that takes two i32 values and returns their sum.
fn add_numbers(x: i32, y: i32) -> i32 {
    x + y
}

fn main() {
    // This works, because we are passing in two i32 values.
    let result = add_numbers(3, 4);
    println!("Result: {}", result);

    // This does not work, because we are passing in three values (arguments) instead of two.
    // Uncomment the line below to see the compiler error:
    // let result = add_numbers(3, 4, 5);

    // This also does not work, because we are passing in a string as an argument instead of an integer (i32) value.
    // Uncomment the line below to see the compiler error:
    // let result = add_numbers(3, "hello");

    // This is a macro that can take a variable number of arguments of different types.
    // It uses a format string to specify how to format the arguments.
    println!("{} {} {}", "The", 42, "Answer");
}
Module System
What is a module in programming?
Our entire code has been so far on one single file (one module). However, when one is working on a large project in Rust, it might be challenging to have millions of lines of code in one file, hence the need to separate the code into parts (separate files) that can be linked up and work together.
According to Technopedia, a module is a software component or part of a program that contains one or more routines. One or more independently developed modules make up a program. An enterprise-level software application may contain several different modules, and each module serves unique and separate business operations.
Having the program in modules makes it easy to build reusable and maintainable code by breaking it down into small, independent parts. It also helps to prevent naming conflicts and reduces the amount of code that needs to be recompiled when changes are made. Multiple modules are compiled into a unit called a crate (explained below).
Rust provides a powerful module system that can be used to hierarchically split code into logical units (modules), and manage visibility (public/private) between them. It provides a powerful and flexible tool for building complex and scalable applications, while also making it easier to write and maintain code.
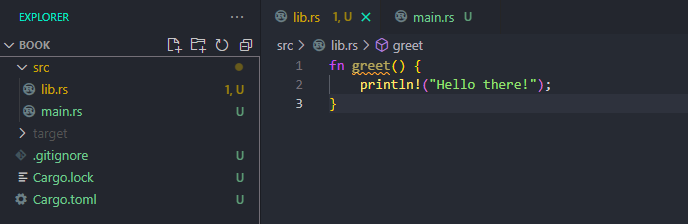
Example: Using our previously made project 'book', we can create another rs file in the 'src' directory, known as lib.rs and add the function below in the file:
fn greet() {
    println!("Hello there!");
}
All items in a library/module are private by default even to binaries in the same project, hence to access or use the greet() function in the main.rs file, we have to make the function public by use of the pub keyword before the function declaration.
// in the lib.rs file

pub fn greet() {
    println!("Hello there!");
}
Secondly, we have to 'import' the module into our main.rs file and to do so first define the module using the mod keyword, then we use the use keyword with the path to where the module is located, starting with the module name, then the symbol (function, struct, enum, etc.) we wanna import, and separated by scope operators - :: which are double colons. (That was lengthy and probably confusing but let us break it down).
To start with, we have used the mod keyword, followed by the module name. In Rust, the mod keyword is used to define a module. Being that we have a different file lib.rs in our program, the compiler will understand that the file is a module after we define it with the mod keyword in our main file. The mod keyword is then followed by the name of the module that you want to define.
Secondly, we use the use keyword to import the module’s contents into the current scope. This means that it will make all of the functions within the module we defined available to call from this point onwards in the rs file that we are at.
We can then call the greet() function from the lib.rs file in our main function at the main.rs file.
// in the main.rs file

mod lib;

use lib::greet;

fn main() {
    greet();
}
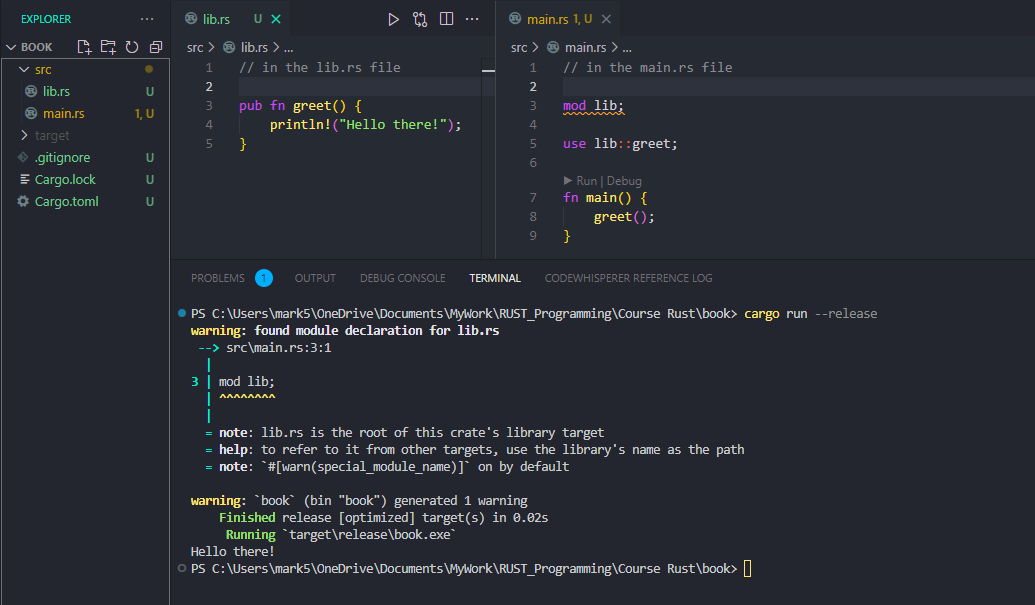
(Do not worry about the warning as we'll discuss more about it in a few)
As mentioned above, the use statement is how we bring into scope anything we want to use from any other module in the project or even anything from the Rust standard library.
Example: use std::collections::HashMap;
The Rust standard (std) library is always available by default.
But what if you need something that's not in the standard library? crates.io is Rust's package registry. A crate is considered to be a synonym for a package. It can contain modules, which are collections of related items, such as functions, structs, enums, or traits and the terms crate and package are used interchangeably. This means that multiple modules are compiled into a unit called a crate (A collection of modules).
Once you have identified the name and version of the package that you want to use, eg. the rand package, which works as a random number generator, you'll head back to the Cargo.toml file and add the package as a dependency, as stated in the documentation.
[package]
name = "book" # name of the package
version = "0.1.0" # version of the package
edition = "2022" # edition of the Rust language

[dependencies]
rand = "0.8.4"
Now that we have it listed in the dependencies, we can bring it into scope and use it from both the library and the binary file(s).
use rand::thread_rng;

fn main() {
    let x = thread_rng().gen_range(0, 100);
}
One may also opt to avoid using the use keyword but has to copy the entire path in each specific line of code the library/package is to be used (this is however tedious more so if the package is to be used in several occurrences as one will keep on rewriting the path in each line the package is to be used).
fn main() {
    let x = rand::thread_rng().gen_range(0, 100);
}
I highly advocate for the use statement in bringing a specific item into scope instead of using an absolute path in each line of code the item is to be used more so if it is to be used in several occurrences.
An addition is that when importing more 'pub' functions into the main.rs file, we can use the use statement once by having all the functions we want to import in curly braces after the module name.
Example: Assuming we have another function in the lib.rs file known as say_hello() and we wanna import it as well into the main.rs file, we can have the importing use statement as: use lib::{greet, say_hello}; Note: The say_hello() function has to be set as public as well by use of pub in the lib.rs file.
use lib::{greet, say_hello};

fn main() {
    greet();
    say_hello()
}
We can also rename a symbol after importing it:
use lib::some_function as my_function; This means that we'll use the some_function as my_function in the file that we have imported it.
To import all the symbols (functions, structs, enums, traits, constants, and other modules etc.) from a module without defining each at a time, we can use the * operator, which means from the lib module, import all the symbols.
use lib::*;
Back to our warning:
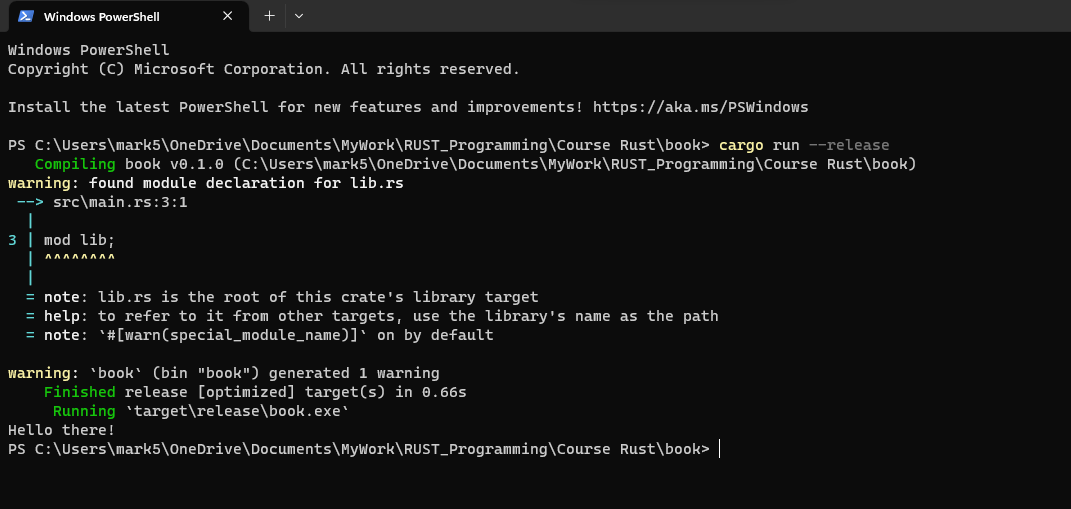
Our program compiles successfully but there's a warning in our book project : warning: `book` (bin "book") generated 1 warning.
To understand this, let's create another file in the src directory known as trying.rs and paste the code below:
// in the trying.rs file

pub fn greet2() {
    println!("Another function!");
}
A small task for you: Try importing the greet2() function into the main.rs file without first checking the image below... (Did you manage to?).
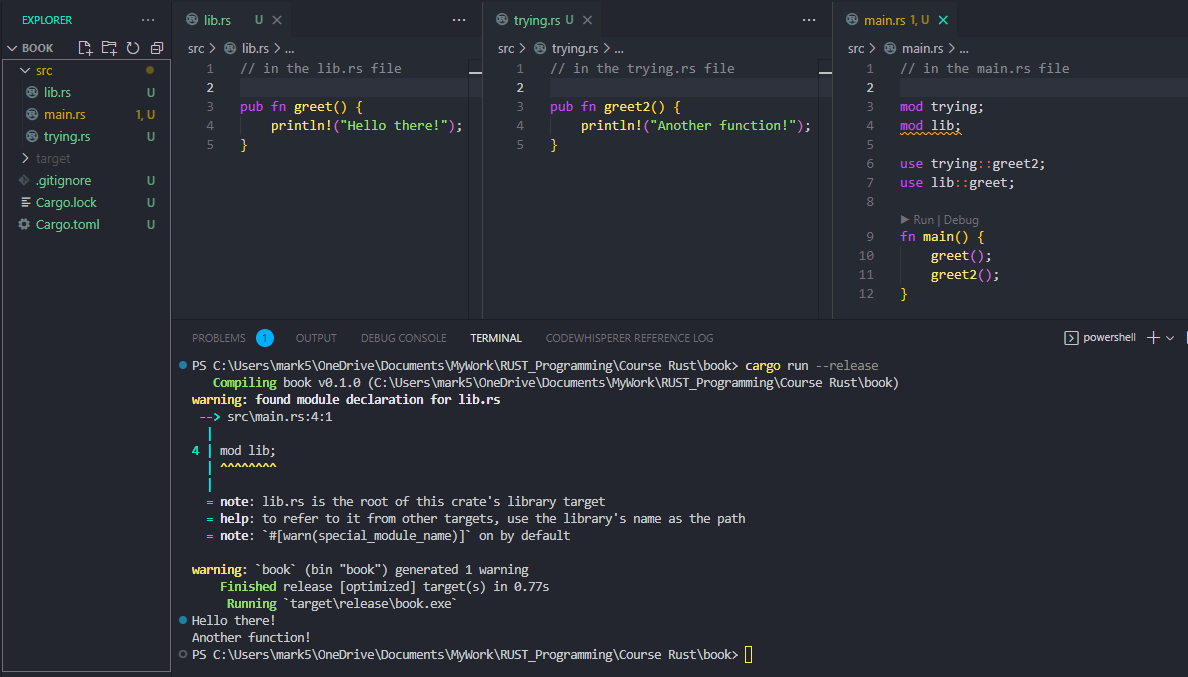
Wait, did the lint flag just highlight mod lib; and ignored the mod trying;? In the terminal, we also notice that the warning is only in line 4 of the main.rs file which is mod lib; We can now break the warning down.
The #[warn(special_module_name)] warning is just a Rust compiler feature that reminds developers to avoid using certain names for modules that could conflict with Rust's special names. Hence, when we use the lib.rs file, the lib.rs file is the main file for the library of a Rust crate. This warning is just a safety feature to avoid naming conflicts with Rust's special names. However, because we are importing the module correctly using the use keyword, then we can safely ignore the warning.
The Rust compiler contains several lints, and when it compiles your code, it will also run the lints. To learn more about lints in Rust.
Are we done with the fundamentals? Yes, we are 🥳 However, I might not have covered all, or if you simply want a more comprehensive reference on Rust programming in general, I highly recommend checking out 'The Rust Programming Language online book'. It's an incredibly comprehensive and well-written resource that covers everything from the basics of Rust syntax to advanced topics like concurrency and system programming which includes building a capstone project 'Building a Multithreaded Web Server'. So if you want to take your Rust skills to the next level, be sure to check it out!
Congratulations on completing the first milestone: RUST 101 🔥
Next, in RUST 102, we gonna be diving more into Rust, learning more about Primitive Types, Control Flow and many more... We are gonna start the section with a fun little exercise on what we have covered in section 1.
Are you excited? I am excited 🚀


